
Stripe handles online checkout on the booking site and payment requests, console card payments, and in-person payments on the OTC POS app and Stripe Terminal readers. The Stripe card on the Payment gateways tab is organized in pills: Connection, Credentials, Webhook, Policies and Hardware.
Getting started
Navigate to Purchases > Payment settings, open the Payment gateways tab and pick Stripe. The card opens on the Connection pill.
How it works
There are two ways to link Stripe. Connecting your Stripe account links it to Off The Couch directly: payments keep settling in your own Stripe account, you keep your Stripe Dashboard, and the webhook and the point of sale app on your readers are handled for you. Pasting API keys on the Credentials pill is the older way and still works; Off The Couch then creates the webhook in your account when you save the secret key.
While the account is connected, the Credentials and Webhook pills are hidden because neither is needed. They come back if you disconnect.
Step-by-step guide
Connect your Stripe account
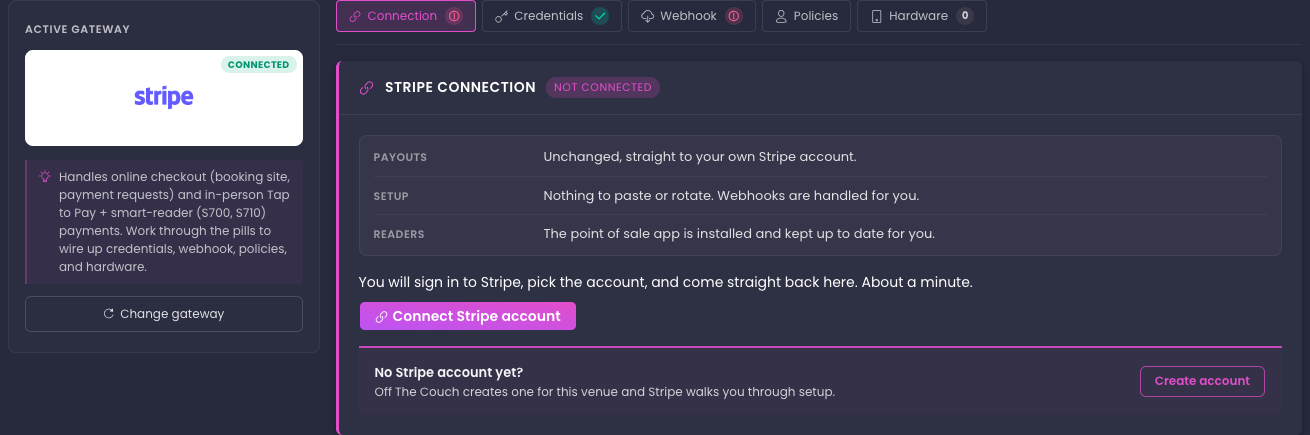
- On the Connection pill, click Connect Stripe account if you already have a Stripe account. If you do not, click Create account and Off The Couch creates one for this venue, with Stripe walking you through its setup.
- Read the Connect to Stripe dialog and click I agree, continue to Stripe. It explains that Stripe may place the account under Off The Couch's platform control, which is what lets Off The Couch manage the point of sale app on your readers, and that saved cards stay with the Stripe account they were saved in.
- Sign in to Stripe, pick the account, and you come straight back to this page. The badge changes to Connected.
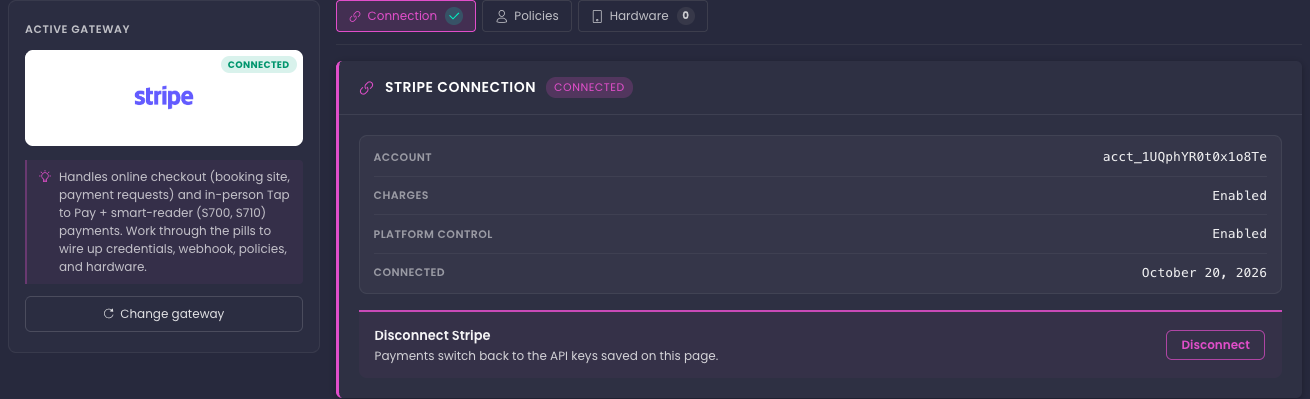
An account created with Create account shows the Onboarding badge and a Continue onboarding button until Stripe has every business detail it needs. Charges reads Enabled once Stripe lets the account take payments.
Platform control reads Enabled or Pending review by Stripe. Accounts created with Create account are under platform control from the start. For an existing account you connected, Stripe reviews it and the status updates on its own; nothing to do on your side.
To end the connection, click Disconnect in the Disconnect Stripe row and confirm. Payments switch back to the API keys saved on this page, or card payments stop until you reconnect or add keys when none are saved.
Paste API keys instead
- On the Credentials pill, click Add test credentials or Add live credentials.
- Enter the Publishable key and Secret key from Stripe's API keys and click Save.
- Read the dialog. Credentials saved with "The Stripe webhook is set up and signature verification is on" means that mode is ready. Click Activate on the set you want in use.
Live credentials are required to take real payments. Test credentials are optional but recommended so you can run the booking site with Stripe's test cards first.
Check the webhook
This section applies to venues on pasted keys only. Stripe confirms each payment to Off The Couch through a webhook; without it the customer's card is charged in Stripe but the booking never confirms, and the customer sees "Invalid transaction! Your cart has expired".
Off The Couch creates the webhook when you save a secret key. Open the Webhook pill to see the result: the pill badge reads Configured once a signing secret is stored and Not set otherwise, and the Managed endpoint block shows whether the endpoint lives in your test or live Stripe account with a status of enabled, disabled or status unknown.
| Save dialog title | Meaning | What to do |
|---|---|---|
| Credentials saved | Webhook created, signature verification on | Nothing |
| Webhook needs your signing secret | A webhook for Off The Couch already exists in your Stripe account but its signing secret is not stored here | Paste that endpoint's secret under Manual setup: signing secret, or delete the endpoint in Stripe and save your key again |
| Webhook not created | Your key cannot create webhooks, or Stripe could not be reached | Give the key webhook write access and save again, save again later, or set the endpoint up by hand |
| Stripe rejected the key | Stripe did not accept the secret key | Check you copied the full key for the right mode and save again |
If the dialog said Webhook not created, follow the manual steps below once per mode.
Set up the webhook by hand
Only for a key that cannot create webhooks, or an organization that manages its Stripe endpoints itself. You add one destination in Stripe's test mode and one in live mode; the two are independent and each has its own signing secret.
- On the Webhook pill, copy the URL from Manual setup: endpoint URL:
https://api.offthecouch.io/stripe-webhook. It is the same for every venue; Off The Couch tells venues apart by the Stripe account that sent the event. - In the Stripe Dashboard, pick the mode with the top-right toggle, open Workbench, then the Webhooks tab, and click Add destination. Older dashboards show Developers > Webhooks and Add endpoint instead; the rest is the same.
- Under Select events, leave the scope on Your account, search for
payment_intent, expand the Payment Intent group and tick Select all Payment Intent events. Click Continue. - Under Choose destination type, pick Webhook endpoint and click Continue.
- Under Configure your destination, name it (for example "Off The Couch"), paste the endpoint URL, and click Create destination.
- On the destination's page, open Signing secret, click Click to reveal and copy the value. It starts with
whsec_. - Back on the Webhook pill, click Add signing secret under Manual setup: signing secret, paste it into Webhook endpoint secret and click Save. The block reads Signature verification enabled and the pill badge reads Configured.
- Repeat in the other mode. Each credential set stores its own secret, so activate the matching set when you switch modes.
- Verify with a test booking in test mode using Stripe's test card 4242 4242 4242 4242: the booking confirms instead of showing "Invalid transaction! Your cart has expired", and the destination's Events tab in Stripe shows 2xx responses.
Configure saved cards and card-on-file rules
On the Policies pill, the Customer management section has four toggles that save as you flip them. A toast confirms each save.
| Toggle | What it does |
|---|---|
| Automatically create a customer in Stripe and link customers to payments | Every payment links to a Stripe customer record. Required before saved cards can work |
| Enable saved payment methods (allow customers to store credit cards for future use) | Lets customers store a card. Shown only when the toggle above is on |
| Require saved payment method for deposit payments | A card on file is required when booking with a deposit. Shown only when saved payment methods is on |
| Require saved payment method for full payments | A card on file is required when the customer pays in full up front; the card is saved automatically and the optional save-card checkbox is replaced by a short notice. Shown only when saved payment methods is on. Independent of the deposit rule |
Turning off customer creation also turns off the three toggles below it; turning off saved payment methods turns off both requirements.
Set the statement description
On the Policies pill, the Statement description section sets the text Stripe attaches to each charge, which appears in your Stripe Dashboard and on the customer's statement. Type it in the Description field (up to 500 characters) and click Save description. Open Supported dynamic variables to copy [Customer First Name], [Customer Last Name], [Customer Email] or [Transaction ID] into the text.
Register a card reader
The Hardware pill lists the Stripe Terminal smart readers (S700, S710 or compatible) registered to this venue. Click Connect a reader, enter the Pairing code from the reader (on the reader, open Settings, then Generate pairing code), optionally a Label, and click Connect reader. Readers are venue-wide and need no further setup: each one appears in Send to POS on any transaction, booking or gift card purchase, listed as Stripe reader, and the payment is recorded on the order when the customer taps. To run the OTC POS app on an S710 instead (page branding, tipping screen, custom fields), pair it on a POS page under Purchases > Point of sale. The full in-person flow is in Point of sale.
The Stripe Terminal location row shows which Stripe location the listed readers belong to; pick a different one if your readers were registered from your own Stripe Dashboard. Each reader row shows its status, device type and id, a pencil to rename it, and Remove, which deregisters it from your Stripe account.
Reference
Connection pill
| Element | Description |
|---|---|
| Connect Stripe account | Links an existing Stripe account. Opens the consent dialog, then Stripe's sign-in |
| Create account | Creates a new Stripe account for this venue; Stripe collects the business details |
| Payouts, Setup, Readers | What connecting changes and what it does not, shown before connecting |
| Account | The connected Stripe account id |
| Charges | Enabled once Stripe lets the account take payments, otherwise Not yet enabled |
| Platform control | Enabled when Off The Couch can manage the point of sale app on your readers, otherwise Pending review by Stripe |
| Connected | The date the connection was made |
| Previous account | Shown after a disconnect, with the account id that was linked |
| Disconnect | Ends the connection. Saved API keys take over again if there are any |
Webhook pill
| Element | Description |
|---|---|
| Configured, Not set | Pill badge: whether a signing secret is stored |
| Managed endpoint | The endpoint Off The Couch created, with its Stripe mode and status badge |
| Manual setup: endpoint URL | https://api.offthecouch.io/stripe-webhook, with a copy button, for keys that cannot create webhooks |
| Manual setup: signing secret | Add signing secret, then Edit or Remove; the field is Webhook endpoint secret and must start with whsec_ followed by at least 32 letters and digits |
Pill status marks
| Pill | Check mark when |
|---|---|
| Connection | The account is connected or onboarding |
| Credentials | Live keys are saved |
| Webhook | A signing secret is stored |
| Hardware | Shows the reader count instead |
Good to know
- Connected accounts need no webhook setup. Off The Couch receives Stripe's events through its own connection; the Webhook pill is hidden while connected.
- Saved cards stay with the Stripe account they were saved in. Connecting the account your keys already belong to keeps every saved card. Connecting a different account, or disconnecting and connecting another one, means customers save their card again at their next purchase.
- The point of sale app reaches your readers automatically only under platform control. Once the Connection pill shows Platform control: Enabled, a reader registered under Hardware downloads the OTC POS app by itself. Other venues install it from their own Stripe Dashboard; see Point of sale.
- Stripe can turn a webhook off after repeated delivery failures. The Webhook pill then shows disabled with a warning; save your secret key again on the Credentials pill to create a fresh endpoint.
- Redirect-based payment methods such as Klarna or Afterpay depend on the webhook entirely. Without it the final confirmation never arrives and the transaction stays pending.
- Saved payment methods require customer creation. Turn on Automatically create a customer first; the saved-cards toggle does not appear otherwise.
- The card-on-file requirements are card-only. Gift cards, cash, customer credit, custom payment methods, pay-on-arrival, zero-amount checkouts, deposit payments and partial payment-request payments are not gated.
FAQ
Q: Should I connect my Stripe account or paste API keys?
A: Connect. It takes about a minute, there is nothing to copy or rotate, and the point of sale app on Stripe readers is installed for you once the account is under platform control. Pasted keys keep working for venues that already use them.
Q: Does connecting change where my money goes?
A: No. Payments settle in your own Stripe account and pay out on your own schedule, exactly as before. You keep full access to your Stripe Dashboard.
Q: Do I need to set up the webhook myself?
A: No. Connected accounts need none, and on pasted keys Off The Couch creates it when you save your secret key. The manual steps are only for a key that cannot create webhooks.
Q: A customer paid in Stripe but the booking shows unpaid or "Invalid transaction". What do I do?
A: The webhook is not reaching Off The Couch. Check the Webhook pill as described above and fix the endpoint; meanwhile refund the orphan charge from your Stripe Dashboard so the customer is not charged twice when they retry.
Q: Stripe shows 401 responses on the webhook events.
A: The signing secret stored here does not match the endpoint Stripe is signing with, usually a secret pasted from a different endpoint or the other mode. Reveal the secret of the endpoint at the Off The Couch URL in the matching mode and paste that one, or Remove it, delete the endpoint in Stripe, and save your key again so Off The Couch creates a fresh one.
Q: My Stripe webhook is not firing. What should I check?
A: Open the Webhook pill. If the Managed endpoint says disabled, save your secret key again. If the badge says Not set, save your secret key on the Credentials pill and read the dialog. If you pasted a signing secret by hand, confirm it came from the endpoint at the Off The Couch URL in the matching mode.
Q: I want every customer paying in full to leave a card on file. How?
A: On the Policies pill, turn on Enable saved payment methods, then Require saved payment method for full payments. Every full-payment card checkout saves the card automatically.
Q: Where do I see the statement description I configured?
A: On each charge in your Stripe Dashboard, with the variables filled in from the customer and transaction.