
Point of sale lets your team take in-person card payments for any transaction in Off The Couch. Staff push a charge from a transaction or booking to a paired device; the customer pays by tapping their card on your phone / tablet or on a connected card reader. Payments flow straight onto the existing transaction (no double entry, no separate POS to reconcile) and the customer-facing screens carry your venue's branding.
In-person payments on the OTC POS app run through your connected gateway: Stripe or Square both work for Tap to Pay. Stripe Terminal smart readers (S700 / S710) require a Stripe connection. Square venues can also pair a Square Reader (contactless and chip) to the OTC POS app over Bluetooth, which lets a tablet or a phone without NFC take cards.
Getting started
Navigate to Purchases > Point of sale in the sidebar. The page lists every POS page you've created (or shows an empty state if you haven't created any yet). The Create POS page button at the top right opens the editor.
Before you can take a real payment, you need three things:
| Need | How to set it up |
|---|---|
| A payment gateway connected | Payment settings > Payment gateways: connect Stripe (including its webhook) or Square. Smart readers need Stripe; the OTC POS app works with either |
| At least one POS page | Built here under Point of sale; see below |
| At least one device | Either the OTC POS app on your Android phone / tablet paired to that page, or a Stripe Terminal smart reader registered under Hardware (readers are not attached to a page) |
How it works
There are two ways to take an in-person payment, both started the same way: open a transaction or booking, click Send to POS, and pick a device.
| Flow | What customers see | When to pick it |
|---|---|---|
| OTC POS app (Tap to Pay) | The full branded checkout (your colors, logo, ready-screen wording, custom-field questions, tip screen, receipt options, and confirmation message) running on your phone or tablet. Customer taps their card on the device. Works with Stripe or Square | Counter / floor staff using a tablet or phone; venues that want a branded customer experience |
| Stripe Terminal card reader (S700 / S710) | A plain card terminal: the reader shows the amount and asks the customer to tap. Stripe's built-in tip prompts appear if tipping is on. None of the OTC branding or custom-field screens appear on the reader | Dedicated countertop checkout; venues that already have or prefer a physical reader |
For the OTC POS app you build a POS page, a reusable template that holds the branding, content, tipping, and custom-field configuration, and pair the app to it. A Stripe reader is not attached to a page: you register it once under Hardware and it is ready. From a transaction, Send to POS lists every app device across every page plus every registered reader, and you pick where to send it.
You can have multiple POS pages (for example, one for the front counter and one for events), each with its own branding, tipping, and devices.
Step-by-step guide
Pick the setup that fits
Use this table to decide which path matches your venue. You can use both at the same time.
| Question | Answer |
|---|---|
| Want the customer-facing screens to be fully branded (your colors, logo, custom questions, tip styling)? | OTC POS app (Flow 1). The Stripe reader is a plain hardware terminal and doesn't render OTC's branded screens |
| Have an Android phone or NFC-capable tablet on a recent Android version (13 or later for Stripe, 9 or later for Square)? | OTC POS app: Tap to Pay on device |
| On Square with a tablet, or with a phone that has no NFC? | OTC POS app with a Square Reader (contactless and chip, 1st or 2nd generation) paired over Bluetooth. The customer taps or inserts their card on the reader instead of on the device |
| Want a dedicated countertop card reader your customer never has to be handed a tablet for? | Stripe Terminal smart reader (S700 or S710) |
| Want tips collected? | Either works. The POS app shows your configured tip screen; the Stripe reader shows Stripe's built-in tip prompt |
The remaining steps are different per flow.
Flow 1: Set up the OTC POS app (Tap to Pay)
1. Create a POS page
| Step | Action |
|---|---|
| 1 | Open Purchases > Point of sale |
| 2 | Click Create POS page at the top right |
| 3 | The editor opens with four sections in the left nav: General, Appearance, Content, Payments |
| 4 | Under General > Identity, enter a Page name (internal: customers see the ready screen title from Content, not this name) |
| 5 | Click Create page |
2. Brand the customer-facing screens
| Section | What you control |
|---|---|
| Appearance > Logo | Show logo on this page toggle plus the logo upload |
| Appearance > Typography | Body font and Card font |
| Appearance > Color palette | Background, Text, Links, Card background, Card text, Button fill, Button label, and Input border. The device's ready, tip, custom-field, and success screens all inherit these |
| Content > Device screens | The Ready screen title and Ready screen subtext customers see while the device waits (e.g., "Welcome to Escape Sacramento" / "Tap to start"), and the Success screen message shown after a successful payment |
3. Configure tips, custom fields, and payment options
Tipping lives under Payments > Tipping. Custom fields, signature, line items, and receipt options live under Content.
| Setting | What it does |
|---|---|
| Allow tipping on this page | Master toggle for the device's tip screen. Every other tipping field is hidden until this is on |
| Field label | The heading on the tip screen (e.g., "Want to leave a tip?") |
| Line item label | How the tip is named on the transaction and receipt (e.g., "Tips") |
| Tip is based on | What percentage tips are calculated on. Amount due uses the remaining balance, taxes and fees included. Whole order uses the full order total even when part is already paid. Subtotal before taxes and fees uses the order subtotal after discounts, so tax and fees never inflate the suggested tip. Customers always pay the amount due plus the tip |
| Preset options | Toggle plus a list of quick-pick chips. Each preset has a Label (e.g., "Good") and an Amount, with a % or $ switch per row. The device shows the resulting amount as the chip headline with your label underneath. Click Add preset for more rows |
| Custom amount | Toggle that lets the customer type their own tip on the device. Custom amount type sets whether they type a Percentage of the tip base or a Flat amount |
| Content > Custom fields | Attach checkbox, short-text, or dropdown questions the customer answers on the device before paying. Each can be marked Required, Requires interaction, or Creates alert (same toggles used by booking site custom fields) |
| Content > Signature | Require signature: the device asks the customer to sign after their tap (before the receipt step) |
| Content > Line items | Show line items: the device lists the order's items on the ready screen instead of only the total |
| Content > Receipt screen > Email on file | When on, the device offers sending the receipt to the customer email already on the transaction, shown masked on the device |
| Content > Receipt screen > Typed email | When on, the customer can type an email address on the device to receive the receipt |
4. Download the OTC POS app
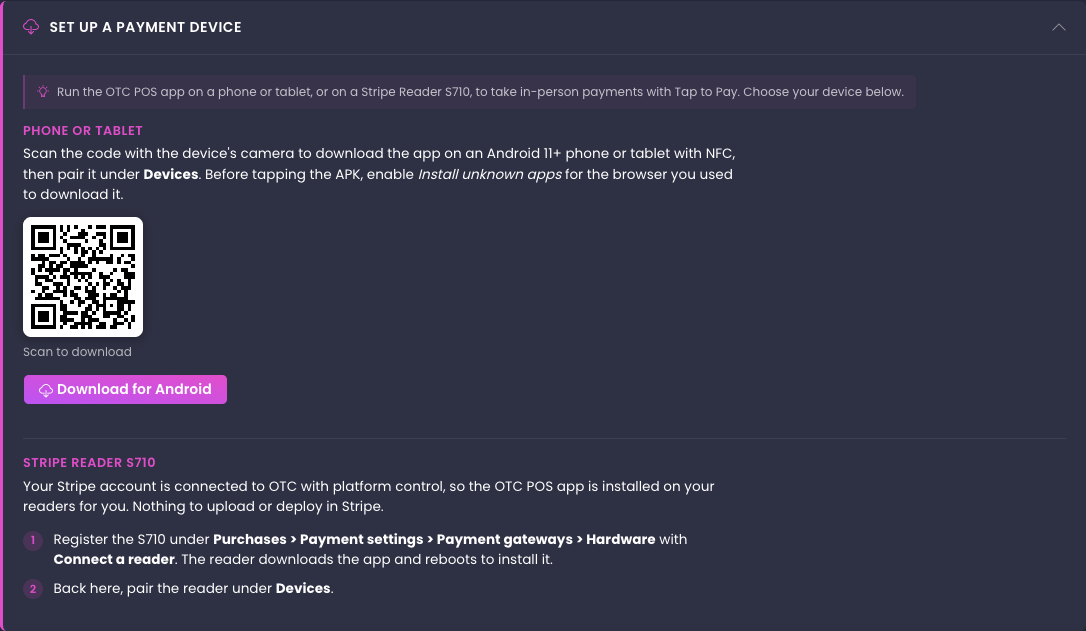
Under General > Set up a payment device, the Phone or tablet block has a QR code and a Download for Android button for the OTC POS app, plus install instructions. Scan the code with the device's camera, or open the link on the device, and install it on the Android phone or tablet you'll use as your terminal. The same section has a Stripe Reader S710 block, and what it shows depends on how your Stripe account is linked to Off The Couch.
If your Stripe account is connected under Off The Couch's platform control (the Connection pill on Payment gateways shows Platform control: Enabled), the OTC POS app is installed on your readers for you. Register the reader under Purchases > Payment settings > Payment gateways > Hardware with Connect a reader; it downloads the app and reboots to install it. Then pair it under Devices on the POS page. Nothing to upload or deploy in Stripe.
Otherwise the block lists the steps for running the app on an S710 through Stripe's Apps on Devices from your own Stripe Dashboard, with a Download for S710 button. When Stripe asks for app information during the upload, enter OTC POS as the app name and io.offthecouch.pos as the package name.
| Device requirement | Notes |
|---|---|
| Android 13 or later (Stripe) or Android 9 or later (Square) | Tap to Pay requires it. Square Tap to Pay works on phones only, not tablets. Tablets on Square take cards through a Square Reader |
| NFC enabled | Required for Tap to Pay. Phones almost always have it; not all tablets do. On Square, a device without NFC can take cards through a Square Reader instead (step 6) |
| Bluetooth and location permissions | The app asks for these when you pair. Allow them: a Square Reader connects over Bluetooth |
| Allow install from unknown sources | Required once to install the APK (a normal Android setting) |
5. Pair the device
| Step | Action |
|---|---|
| 1 | Back in the editor, open General > Devices |
| 2 | Click Add device and choose OTC POS app. The Pair OTC POS tablet form opens with a Device name field and a Pairing code that expires after a countdown |
| 3 | On the device, open the OTC POS app, tap Pair to a page, and enter the 6-digit code |
| 4 | Set a 4-digit PIN on the device to lock it between transactions |
| 5 | The device appears in the Devices list with its name, type, and online status. It's ready to take payments |
If you add a device on a brand-new (unsaved) page, the editor saves the page automatically and walks you straight into pairing.
Square venues: one-time Tap to Pay setup. If your connected gateway is Square, complete Square's device setup once before the first payment: open the device's Admin screen (the hidden long-press on the ready screen), tap Square reader settings, and follow Square's Tap to Pay setup prompts. Until this is done, Square asks to connect hardware instead of offering the phone's tap.
6. Square venues: connect a Square Reader
Use a Square Reader (the contactless and chip reader, 1st or 2nd generation) when the device can't take taps itself: any tablet on Square, or a phone without NFC. The reader pairs inside the OTC POS app, not in Square's own app.
| Step | Action |
|---|---|
| 1 | Pair the device to a POS page first (step 5). Square reader settings only open on a paired device |
| 2 | Turn on Bluetooth on the phone or tablet |
| 3 | If the reader is connected to the Square Point of Sale app on any device, close that app. The reader holds one connection at a time |
| 4 | In the OTC POS app, press and hold the centre of the ready screen for three seconds to open Admin |
| 5 | Under Square, tap Square reader settings |
| 6 | On Square's screen, tap the option to connect a reader |
| 7 | Hold the reader's button for about four seconds until its lights flash orange, then tap the reader when it appears in the list |
| 8 | Close Square's screen. The next order sent with Send to POS takes the card on the reader |
Pairing done in the Square Point of Sale app or shown in the Square Dashboard does not carry over: each app keeps its own pairing. If the device still asks to connect hardware after you paired the reader in Square's app, pair it again through the steps above.
The Card reader choice on the Admin screen (Tap to pay or Bluetooth reader) applies to Stripe venues. On Square, leave it as it is: Square uses whichever reader is connected in Square reader settings.
Flow 2: Connect a Stripe Terminal card reader (S700 / S710)
| Step | Action |
|---|---|
| 1 | Go to Payment settings > Payment gateways > Hardware |
| 2 | Click Connect a reader and follow Stripe's pairing prompts. Once registered, the reader belongs to your venue |
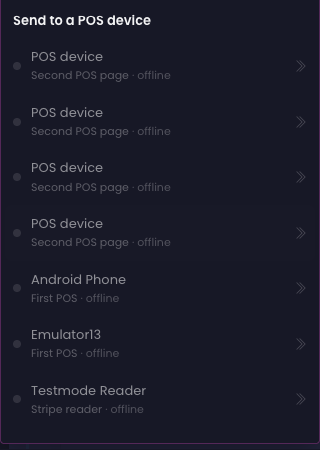
| 3 | Open any unpaid transaction or booking and click Send to POS: the reader is listed as Stripe reader with its online status, after your app devices |
Nothing is attached to a POS page for a reader. The Devices section of a POS page holds only devices running the OTC POS app.
When staff send to a reader, the reader shows the amount and the customer taps. The payment is recorded on the transaction as soon as the tap goes through, and the in-progress drawer on the console turns to Payment received. Sending the same order to a reader again after the customer has already tapped records that payment and refuses the second send, so the card is never charged twice. Cancelling from the drawer after a tap records the payment instead of cancelling it.
Reader-specific notes:
| Aspect | Notes |
|---|---|
| Branding | The reader is hardware; it doesn't render OTC's ready / custom-field / confirmation screens. Customers see the standard Stripe-on-reader prompts |
| Tipping | The on-reader tip prompts come from Stripe (configured in your Stripe Dashboard, not in OTC's POS page) |
| Custom fields | Don't apply on the reader. If you need custom fields, use the OTC POS app instead |
Take a payment with Send to POS
| Step | Action |
|---|---|
| 1 | Open the transaction details page, or expand the Booking drawer on any booking. A new gift card purchase can also be sent while you create it: see Gift card purchases |
| 2 | Click Send to POS |
| 3 | A picker appears listing every online device across every POS page. Pick the device you want the customer to pay on |
| 4 | The order is delivered to that device. The amount sent is the transaction's remaining balance due (so a partial-paid transaction sends only what's still owed) |
| 5 | A small in-progress tracker drawer follows you as you navigate, showing the device name, order number, elapsed time, and live status (waiting for tap → processing → paid). Click Cancel in the tracker to recall a pending payment |
| 6 | When the customer taps their card and the payment processes, the transaction's balance updates automatically and you see a confirmation toast |
Customer experience on the device (Flow 1)
The OTC POS app walks the customer through these screens in order:
| Screen | Notes |
|---|---|
| Ready screen | Your title and subtext (configured in Content). Waits for an order |
| Custom fields | The questions you attached, in order. Required fields block "Continue" until filled |
| Tip screen | Shown if tipping is enabled. Presets, custom amount, skip |
| Tap | Customer taps their card on the device |
| Signature | Shown if signature is enabled in Payments |
| Receipt | Customer picks the email on file (shown masked) or types an address, depending on which Receipt screen options are on. If both receipt options are off, this screen is skipped |
| Confirmation | Your confirmation message |
Between transactions the device returns to the ready screen (or the PIN lock if auto-lock has fired).
Staff access on the device
Press and hold the centre of the ready screen for three seconds to reach device settings: that is where staff set the auto-lock delay, lock the device immediately, re-pair it with a new 6-digit code, choose how the device takes cards, or open Square reader settings. There is no visible button on purpose, so customers can't tap their way into staff settings.
Auto-lock
In the Devices list on the POS page, each device has an Auto-lock setting controlling how long the device stays at the ready screen before requiring the 4-digit PIN. Use a short lock when the device is left unattended; turn it off entirely for high-touch counter use.
Screen stays on
While the OTC POS app is open on an Android phone or tablet, the device screen does not time out, so a device mounted at a counter does not fall back to the Android lock screen between customers. There is no need to change the phone's display timeout or turn on Developer options (which Stripe Tap to Pay does not allow). Switching to another app or closing the POS app restores the device's normal screen timeout.
Reference
Menu locations
| What | Where |
|---|---|
| POS pages list and editor | Purchases > Point of sale |
| Stripe Terminal reader registration | Payment settings > Payment gateways > Hardware |
| Stripe gateway + webhook setup | Stripe payment gateway |
| Send to POS | Transaction details, any Booking drawer, or the Create a gift card purchase drawer |
POS page editor section nav
| Section | What it controls |
|---|---|
| General | Identity (page name and surface type), Devices, and Set up a payment device |
| Appearance | Logo, Typography, Color palette |
| Content | Device screens (ready screen title, subtext, success screen message), Custom fields, Signature, Line items, Receipt screen |
| Payments | Tipping |
Device types
| Type | Hardware | Branded screens | Custom fields | Tip screen | Where to attach |
|---|---|---|---|---|---|
| OTC POS app | Android phone or NFC tablet, Android 13+ (Stripe) or Android 9+ phone (Square) | Yes | Yes | OTC's | POS page > Devices |
| OTC POS app with a Square Reader | Android 9+ phone or tablet with Bluetooth (NFC not needed), plus a Square Reader for contactless and chip. Square venues only | Yes | Yes | OTC's | POS page > Devices, then Square reader settings on the device |
| Stripe smart reader | S700 / S710 (or compatible) | No (hardware terminal) | No | Stripe's | Payment gateways > Hardware only |
The OTC POS app charges through your connected gateway, Stripe or Square. Smart readers require Stripe.
Receipt screen (POS app)
| Option | What it does |
|---|---|
| Email on file | Offers the customer email already on the transaction, shown masked on the device |
| Typed email | Customer types an address on the device |
| Both off | The receipt screen is skipped and the device goes straight to the confirmation screen |
Pairing the OTC POS app
| Element | Notes |
|---|---|
| Pair code | 6 digits, generated per device add |
| Device PIN | 4 digits, set on first pair, used between transactions |
| Status | Online / offline shown live in the Devices list |
Send to POS tracker
| Element | Notes |
|---|---|
| Position | Follows you across the console as a drawer |
| Shows | Device name, order number, elapsed time, status |
| Status | Waiting for tap → Processing → Paid |
| Actions | Cancel a pending payment |
Amounts and partial payments
| Behavior | Notes |
|---|---|
| Amount sent | The transaction's remaining balance due at the moment of Send to POS |
| Partial-paid transactions | Send to POS sends only the balance, not the original total |
| Tip is based on | Percentage tips can be applied to the amount due, the whole order, or the subtotal before taxes and fees, picked in the POS page's Tipping section |
Tipping config (POS app)
| Field | Notes |
|---|---|
| Allow tipping on this page | Master toggle |
| Field label | Heading on the tip screen |
| Line item label | Name of the tip on the transaction and receipt |
| Preset options | Quick-pick chips, each with a label and a % or $ amount |
| Custom amount | Free-entry tip; Custom amount type is Percentage of the tip base or Flat amount |
| Tip is based on | Amount due / Whole order / Subtotal before taxes and fees |
Custom fields (POS app)
| Type | What customers see |
|---|---|
| Checkbox | A single checkbox the customer ticks |
| Short text | A one-line text input |
| Dropdown | A picker of preset options |
Per-field toggles:
| Toggle | Effect |
|---|---|
| Required | Blocks "Continue" until filled |
| Requires interaction | Customer must actively tap / type even if a default is set |
| Creates alert | Customer's response triggers an internal alert visible in the transaction and booking drawer |
Device requirements (OTC POS app)
| Requirement | Why |
|---|---|
| Android 13+ (Stripe) or Android 9+ (Square) | Tap to Pay support |
| NFC | The tap mechanism for Tap to Pay. Not needed when a Square Reader takes the card |
| Bluetooth | Needed to connect a Square Reader |
| Allow install from unknown sources | One-time; needed to install the APK |
Devices without NFC can still install and pair the app, but Tap to Pay won't work on them. On Square, pair a Square Reader to take cards on these devices. On Stripe, the device shows "This device can't take taps" when an order is sent to it.
Good to know
- The app follows your gateway. The OTC POS app charges through whichever gateway is connected under Payment gateways: Stripe or Square. Stripe Terminal smart readers work only with Stripe.
- Stripe venues: check the Stripe webhook shows Configured. Off The Couch creates it when you save your Stripe secret key. Without it, Stripe charges the customer but the success doesn't reach Off The Couch, so the transaction would not update. The webhook is required for both online and in-person Stripe payments.
- Receipt emails ride email automation. The device collects the address, but the email itself is sent by an automation with the POS receipt requested trigger. Create one under Automation with your receipt template; without an active automation for that trigger, no receipt email goes out.
- Send to POS lists every device, online or not. An offline device is greyed out and cannot be picked. If an app device is missing, confirm it is paired to a POS page (the Devices list on the page shows status). If a Stripe reader is missing, confirm it is registered under Hardware and sits in the Stripe Terminal location shown there.
- Readers follow your Stripe mode. With live Stripe credentials active, Send to POS lists the readers in your live Terminal location; with test credentials active, it lists the test location's readers and they take test taps only.
- A reader is plain hardware. Custom fields, signatures, and your branded ready / confirmation screens only render on the OTC POS app. The reader shows the amount and tap prompt only.
- One device, one PIN. The 4-digit PIN is per device. Each device you pair gets its own PIN at first pair.
- The page name is internal. Customers don't see it on the device; they see the title from Content. Use the page name for staff clarity ("Front counter", "Events").
- Tip is based on affects percentages, not flat tips. The choice between amount due, whole order, and subtotal before taxes and fees only matters when the customer picks a percentage preset or types a percentage. A flat preset or a custom tip typed in dollars is always treated literally.
- The device shows what the percentages apply to. When the tip is based on something other than the amount being charged (whole order on a partly paid order, or the subtotal before taxes and fees), the tip screen adds a "Tip calculated on" line with that amount above the total, so the customer can see why 20% is not 20% of the charge.
- Custom fields and signature don't apply on the reader. If your workflow depends on either, route payments to the POS app rather than the reader.
- The OTC POS app is Android-only today. iOS Tap to Pay isn't supported.
- You can use both flows at the same time. App devices on your POS pages and your registered readers all appear in the same Send to POS list, so you pick at the moment of charge.
FAQ
Q: Do I need a separate POS terminal?
A: No. The OTC POS app turns your existing Android phone or tablet (with NFC, Android 13 or later for Stripe, Android 9 or later for Square) into the terminal. If you'd rather use a physical countertop reader, connect a Stripe Terminal S700 or S710 under Payment settings > Hardware and link it to a POS page.
Q: Does it work with Square?
A: Yes, on the OTC POS app. If Square is your connected gateway, Tap to Pay payments on your phone run through Square. Complete Square's one-time device setup first (see the pairing steps above). Tablets and phones without NFC take cards through a Square Reader paired in the app. Stripe Terminal smart readers are the one exception: they require a Stripe connection.
Q: Can I use my Square Reader with the OTC POS app?
A: Yes, if Square is your connected gateway. The Square Reader for contactless and chip (1st or 2nd generation) pairs over Bluetooth from Square reader settings on the device's Admin screen; see "Square venues: connect a Square Reader" above. The device itself does not need NFC, because the customer taps or inserts their card on the reader.
Q: I paired my Square Reader in the Square app, but the OTC POS app still asks to connect hardware. Why?
A: Each app keeps its own reader pairing, so a reader paired in the Square Point of Sale app is not visible to the OTC POS app. Close the Square app, then pair the reader from Square reader settings on the OTC POS app's Admin screen.
Q: Does it work with iPhone or iPad?
A: Not today. The OTC POS app is Android-only. If you want a non-Android terminal, the supported alternative is a Stripe Terminal card reader (S700 / S710).
Q: How do I take a payment?
A: Open any transaction (or expand the Booking drawer on a booking), click Send to POS, and pick the device. The amount is the transaction's current balance due. The customer taps their card on the device; the transaction updates automatically when Stripe confirms.
Q: Can I cancel a payment mid-flight?
A: Yes. The in-progress tracker drawer shows a Cancel button. Use it before the customer taps; once the card has been authorized at Stripe, you'd refund instead of cancel.
Q: My device doesn't show up in Send to POS. Why?
A: For an app device, check that it is paired to a POS page (Devices list on the page) and online (the list shows status live). For a Stripe reader, check that it is registered under Payment settings > Payment gateways > Hardware, that it sits in the Stripe Terminal location shown there, and that your active Stripe credentials match the reader's mode (live readers with live credentials, test readers with test credentials).
Q: My tablet doesn't have NFC. Can I still use the app?
A: You can install and pair the app, but Tap to Pay won't work because there's no NFC chip to read the card. On Square, pair a Square Reader to the app and the customer taps or inserts their card on the reader. On Stripe, use an NFC-capable phone or tablet (almost all phones have NFC) or a Stripe Terminal card reader instead.
Q: Can the customer pay with cash or a different method?
A: Point of sale is for card-present payments. For other methods (cash, custom payment methods), record the payment from the transaction details page using the standard payment-method flow.
Q: Which tip base should I pick?
A: Amount due matches what most card terminals do: the tip is a percentage of the amount being charged right now. Subtotal before taxes and fees is the common choice for venues that do not want customers tipping on tax or service fees. Whole order suits venues that take deposits and want the tip to reflect the full visit even when most of it was prepaid. Existing pages keep Amount due until changed.
Q: What happens to tips on a Stripe reader?
A: The reader shows Stripe's built-in tip prompts (configured in your Stripe Dashboard's Terminal settings), not the OTC POS page's tipping configuration. If you need OTC's tip styling and tip-base options, route payments through the POS app instead.
Q: How do receipts get to the customer?
A: On the OTC POS app, the customer picks the email on file (shown masked) or types an address, depending on which Receipt screen options you enabled on the POS page. The email itself sends through an automation with the POS receipt requested trigger, set up under Automation. On a Stripe reader, receipts follow your Stripe Terminal receipt settings.
Q: Can I have multiple POS pages?
A: Yes. A venue can have any number of POS pages (for example, one for "Front counter" and one for "Events"), each with its own branding, tipping, custom fields, and devices.
Q: What happens if the device is offline when staff hit Send to POS?
A: The picker shows the device greyed out as offline and won't send to it. Reconnect it (re-open the app, or check the reader is powered on and connected to Wi-Fi) and try again.
Q: Is the POS app secure if I leave the tablet on the counter?
A: The 4-digit device PIN locks the device between transactions, and the auto-lock setting (configured per device on the POS page) puts the device back at the lock screen after a chosen interval of inactivity. Customers also can't reach staff settings through any visible button; staff access lives behind a hidden long-press gesture.
Q: Does the in-person payment hit the same Stripe account as my online booking site?
A: Yes. Point of sale uses the same Stripe gateway you've connected under Payment gateways. One account, both surfaces.
Q: Who on my team can use Point of sale?
A: Admins and managers can send orders to devices out of the box. For custom roles, the Configure point of sale permission controls building POS pages and managing devices, and the Create and update payments permission covers sending, tracking, and cancelling POS payments. Both are managed under custom roles and permissions.